Monday, November 12, 2018

Review: 2018 Chrysler Pacifica Hybrid Shows Off Solid CarPlay Integration With Uconnect Infotainment System

https://ift.tt/2DBf2bY

Fiat Chrysler Automobiles (FCA) is home to a number of vehicle brands, including Dodge, Jeep, Ram, and of course Chrysler and Fiat. All of these brands include FCA's Uconnect infotainment system, the most recent version of which, version 4, began making its way into vehicles for the 2017 and 2018 model years. Vehicles with Uconnect 4 support both CarPlay and Android Auto, and I recently had an opportunity to test out a 2018 Chrysler Pacifica Hybrid Limited equipped with a Uconnect 4C NAV system that includes built-in navigation.


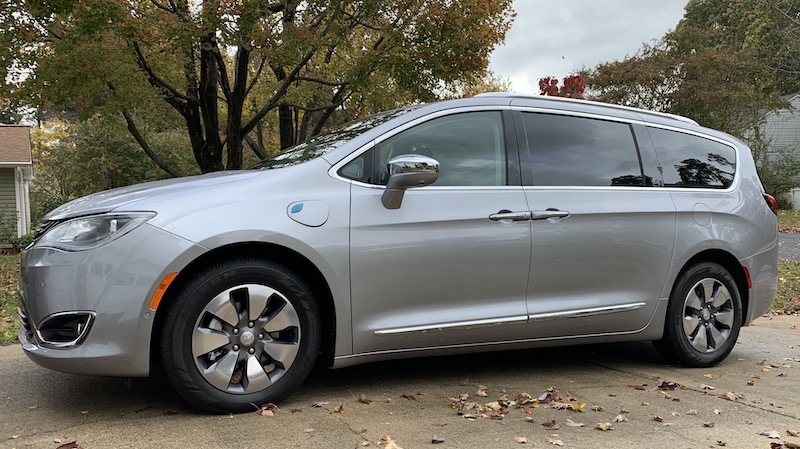
The Pacifica Hybrid is a plug-in hybrid, and really the only such vehicle available in the minivan segment in the United States, so it has a lot going for it in that regard. With a charge that takes just a couple of hours with a 240V level 2 charger or more like 14 hours with a 120V level 1 charger, you get roughly 33 miles of battery-only operation.

Otherwise, the Pacifica acts as a traditional hybrid, supplementing the gas engine and recapturing some energy through regenerative braking to recharge itself. Overall, the Pacifica Hybrid is rated at 84 MPGe (32 MPG in gas-only mode) and offers up to 570 miles of range.

Overview of center stack infotainment system and other controls

Unsurprisingly, my test vehicle was outfitted with lots of bells and whistles, including a 20-speaker Harman Kardon audio system that sounded great and a host of safety features including standard ParkSense sensors to alert of you of obstacles at front and rear, optional parallel and perpendicular parking assist that controls the steering wheel for you, and adaptive cruise control with stop and go support.

You'll also find a lane departure warning with assist feature to help keep you in your lane, blind spot monitoring, rear cross-traffic warnings, collision warning with automatic braking, bird's eye surround view, rain-sensing wipers, and more. KeySense technology recognizes which key is being used to operate the vehicle and lets you customize settings for each driver.

Uconnect


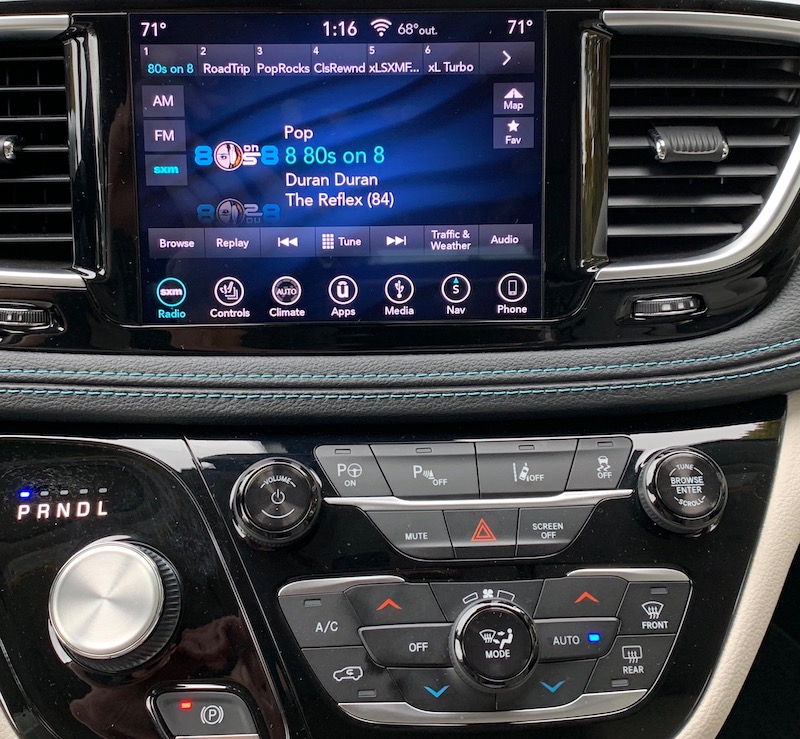
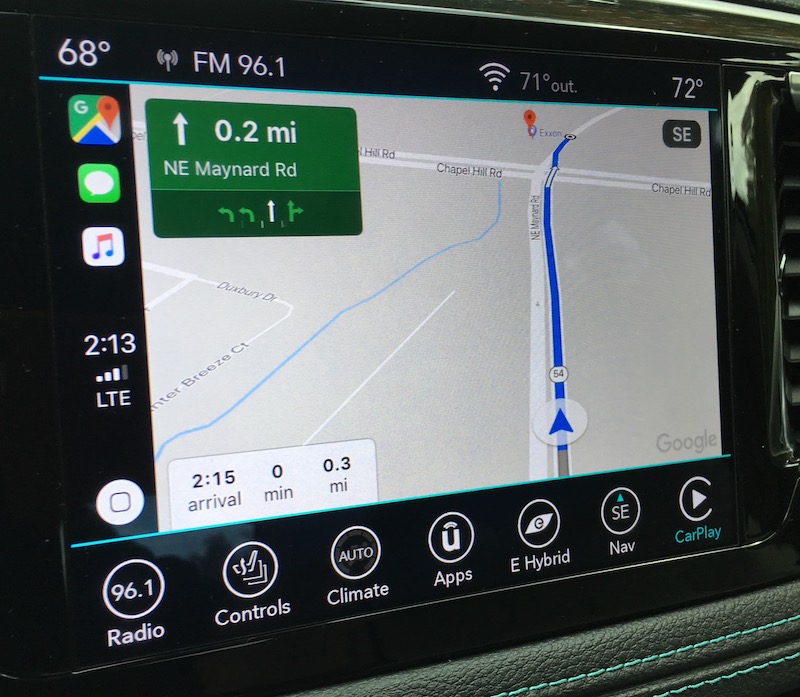
The 2018 Pacifica comes with an 8.4-inch flush-mounted display in the center stack, and it's a bit more square than some other infotainment system displays. As a result, FCA is able to include persistent status and menu bars at the top and bottom of the screen, with the currently active function taking up the majority of the display. The top status bar displays information like temperature settings for driver and passenger, the current radio station, clock, exterior temperature, and Wi-Fi signal if you have the available hotspot functionality activated.


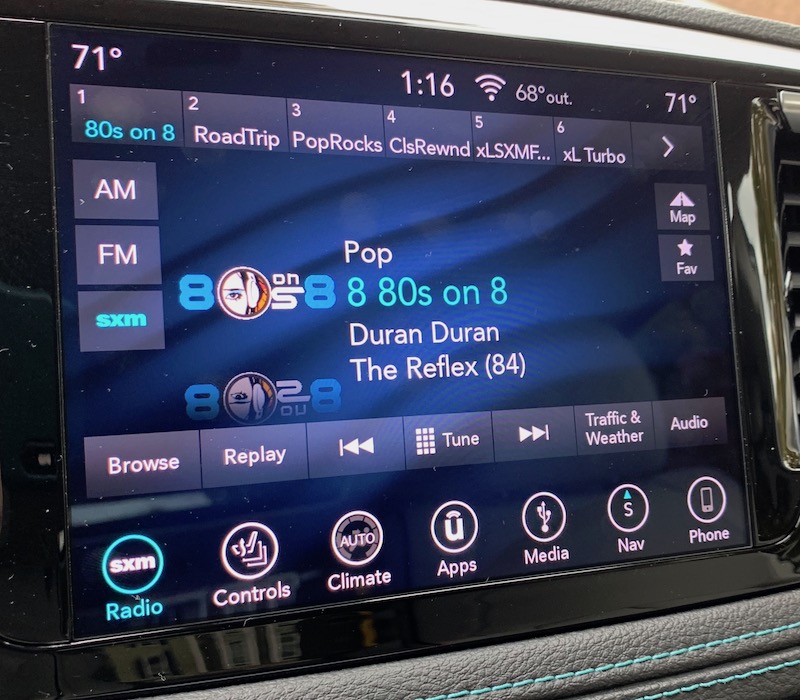
The bottom menu bar is customizable and provides easy access to a variety of functions, and the buttons can update in real-time to show information relative to the specific functionality. For example, the Radio icon will also display the current station, while the Nav icon will show your current compass heading and the Phone icon will show the signal strength of a connected device.


Other buttons control systems such as heated/ventilated seats, heating and air conditioning, connected media devices, and paired phones. An Apps icon gives you access to up to two dozen such sections, and you can press and hold any of them and drag them to the menu bar.


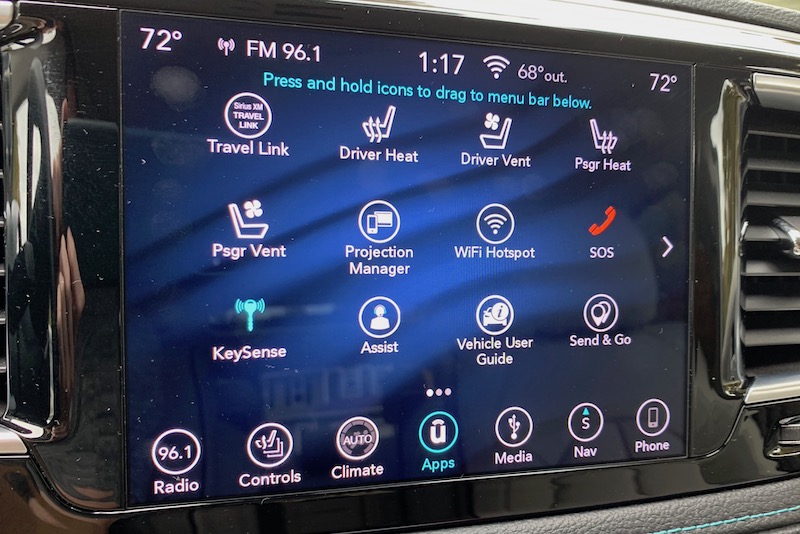
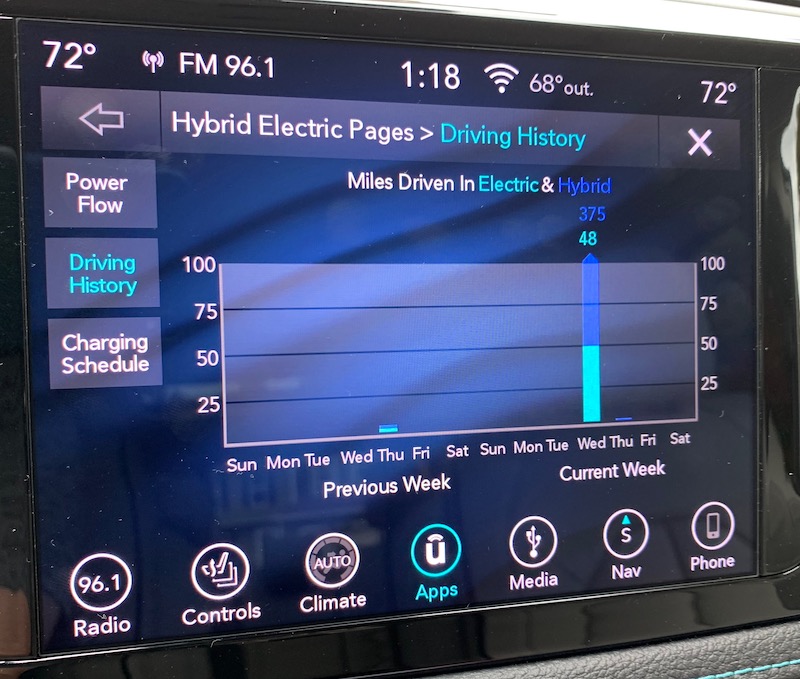
The Pacifica Hybrid even has a Hybrid Electric app that will give you a live view of your power flow as well as your driving history that shows you how far you've driven on electric and gas power over the past two weeks. You can also set your charging schedule in case you want to take advantage of lower electricity rates at night, for example.


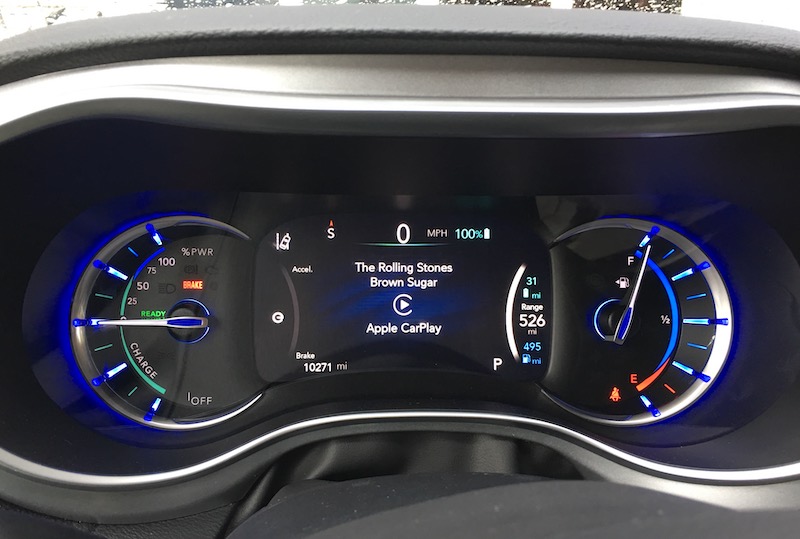
Overall, the 8.4-inch display is bright and clear, although its glossy finish does tend to attract fingerprints. A supplemental 7-inch driver information display can be configured to show information like audio track, turn-by-turn directions, and more.

Driver display with audio information

Built-in Navigation


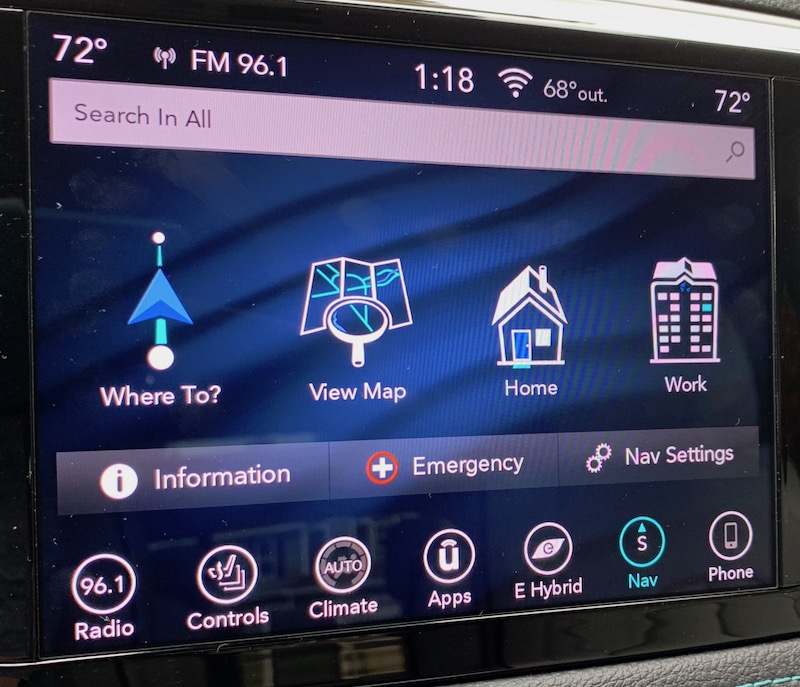
I came away impressed with Uconnect's navigation capabilities. It all starts with the initial menu screen you see when you launch the navigation app, which offers immediate access to address/POI search, a direct map view, and quick-access directions to home or work, once those are configured. There's also easy access to directions to emergency services like hospitals, which can be an important lifesaver in an unfamiliar area.


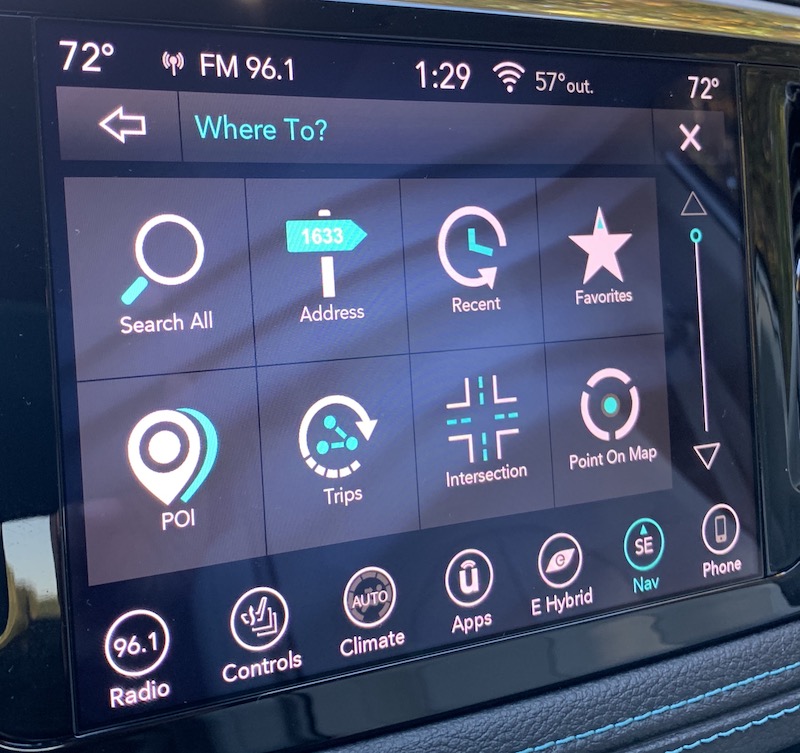
From there, it's one more tap into a menu that offers a number of other options for finding your destination, including search, exact address, lists of recent and favorite destinations, POIs, and more. Of course, voice is the easiest way to input a destination, and I found the built-in voice assistant very good at recognizing my spoken destinations and interpreting them correctly.


Once a destination is found and a route plotted, Uconnect's navigation system offers an overview of the route and the ability to change certain options if you want to optimize things, and then you're off and running.


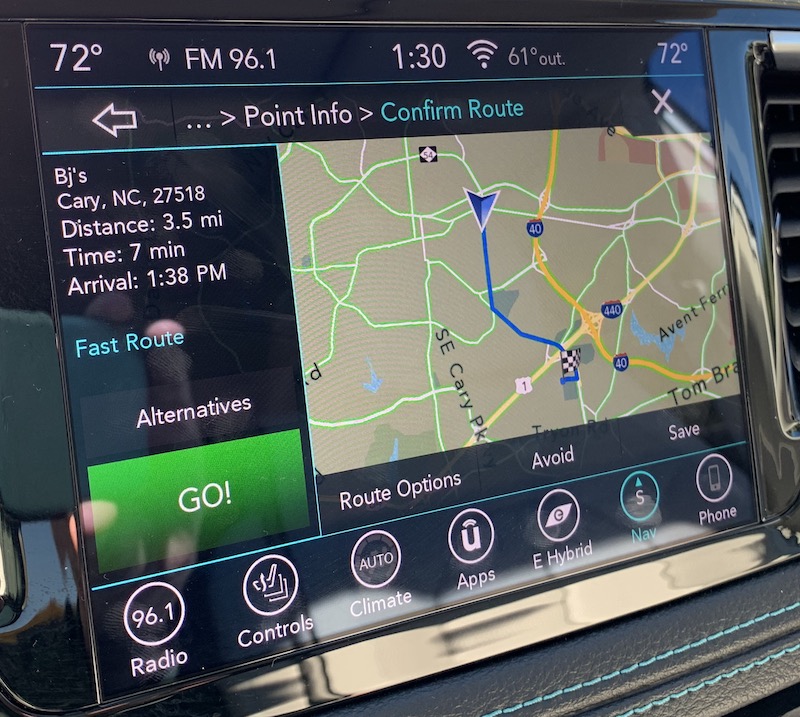
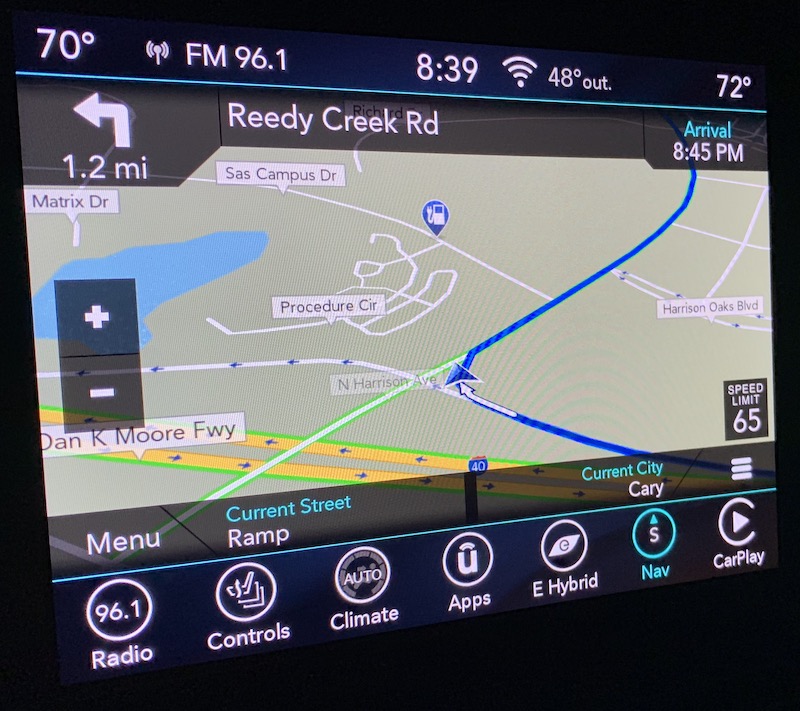
During navigation, the Uconnect system offers an information-rich display that includes all of the usual metrics such as a map with large zoom buttons, current speed limit, upcoming maneuvers, and arrival time, as well as your current street and city. Voice guidance is accurate, timely, and natural-sounding.


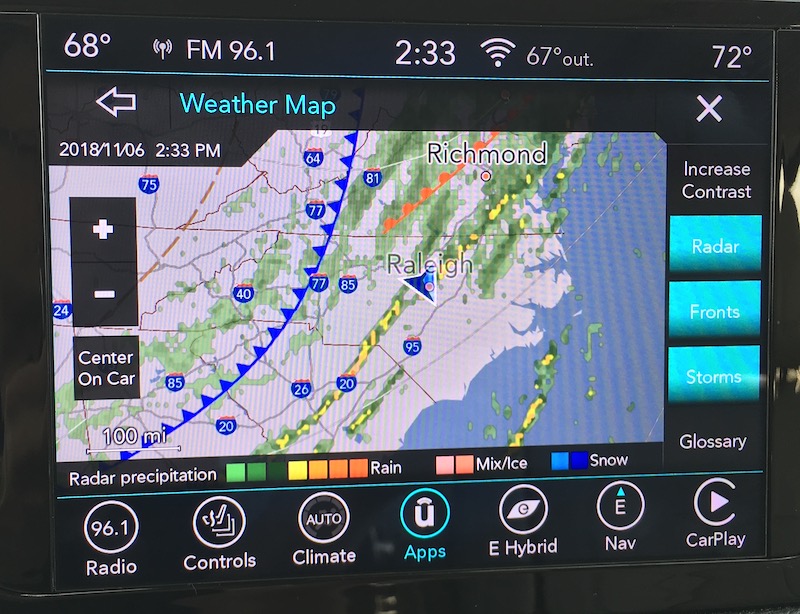
Complementing the built-in navigation is support for SiriusXM Travel Link, a subscription service that offers data such as weather, nearby fuel prices and movie listings, sports scores, and stock prices. A five-year subscription to Travel Link is included with the Pacifica.

SiriusXM Travel Link weather map

Climate Control


In an age of increasingly complex and multi-purpose infotainment systems, there's been considerable controversy over whether basic functions like climate controls should be incorporated into them. While infotainment systems are powerful and convenient, their touchscreen nature is more difficult to navigate by feel than hardware knobs and buttons, and many have advocated for keeping climate controls, which generally have a limited number of options and are frequently adjusted, as physical controls rather than on-screen ones.

Main climate controls

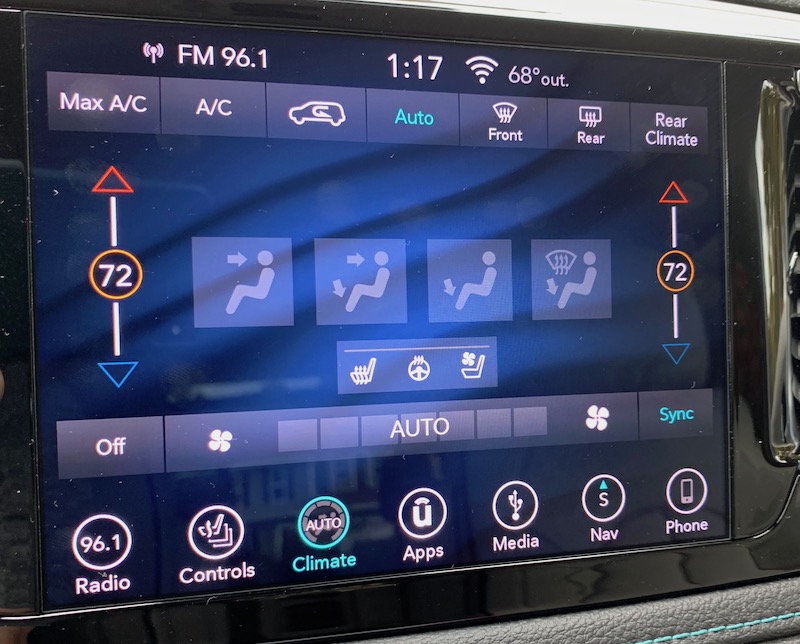
Chrysler has tried to split the difference in the Pacifica, offering both hardware and on-screen controls. The physical knob and buttons make it easy to adjust the mode, temperature set points, fan speed, and defrosters nearly by feel. Those are going to be your most frequently adjusted options on a climate control system, so it makes sense to make them easy to adjust.

Hardware climate controls below the Uconnect display

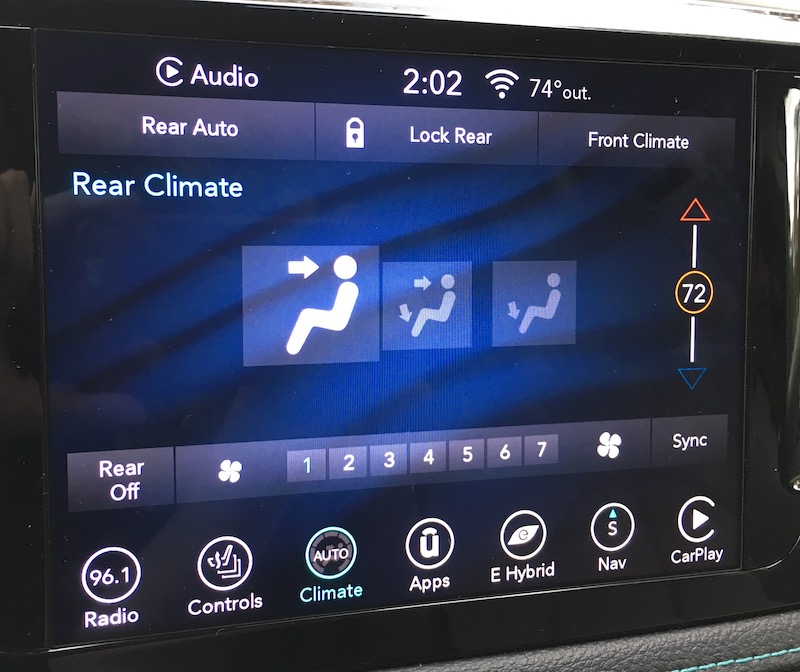
All of these functions are, however, also available through the Uconnect system, which even offers a few more options. For example, if you want to sync the driver and passenger temperature settings or control the rear climate system, you'll need to dive into the Uconnect system. But even when you do, the most commonly used functions come with large icons that are easy to tap.

Rear climate controls

CarPlay


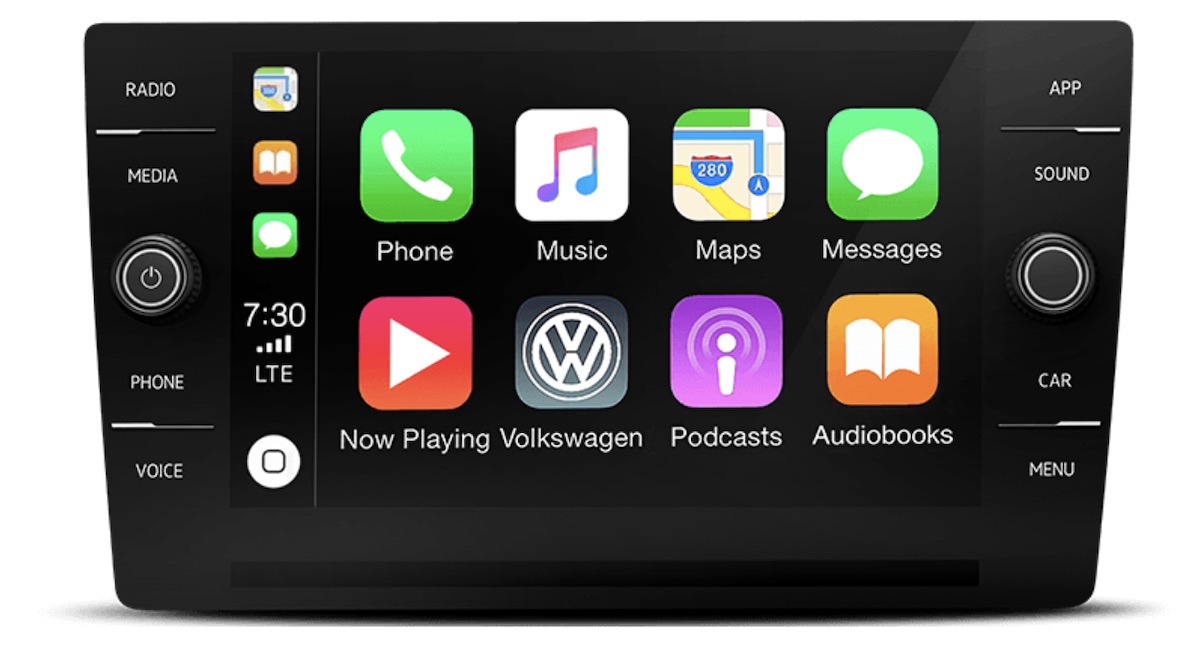
When you plug your iPhone into the specified USB port on the dashboard, you'll go through the usual process of granting access for CarPlay, at which point the standard CarPlay home screen will pop up on the Uconnect display. You'll quickly notice that in addition to CarPlay, the Uconnect status and menu bars remain visible at the top and bottom of the display.


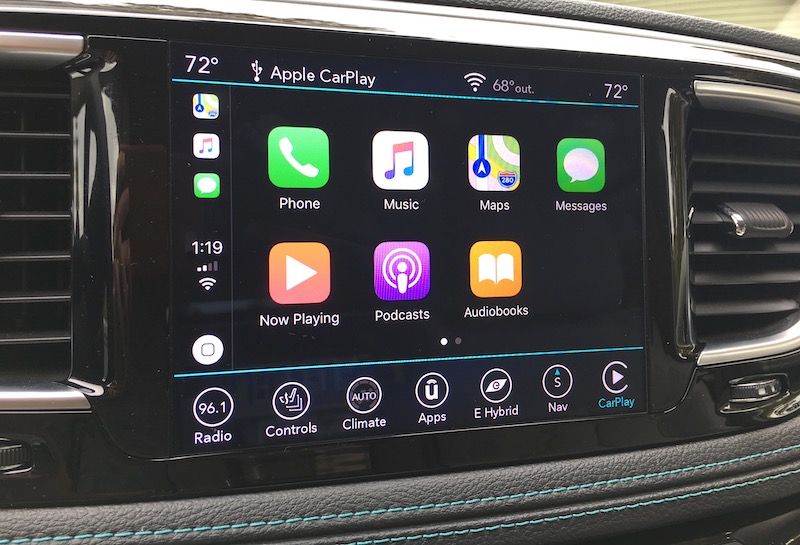
This is a fantastic way to integrate CarPlay into the native infotainment system, as it makes it incredibly easy to hop in and out of CarPlay as needed. The Phone icon in the menu bar even automatically changes to a CarPlay button when you plug in your phone.

CarPlay's "Now Playing" screen

On some all-touchscreen infotainment systems, CarPlay takes over the entire display, which can make it a bit difficult to get back to the vehicle's own system unless you use voice commands or there's a dedicated hardware button to take you back to the native home screen. CarPlay's built-in solution is to have an "app" on its home screen for the car manufacturer, and selecting that icon will take you back to the native system. Other infotainment systems use a widescreen display that's able to show some information from the native system alongside CarPlay.

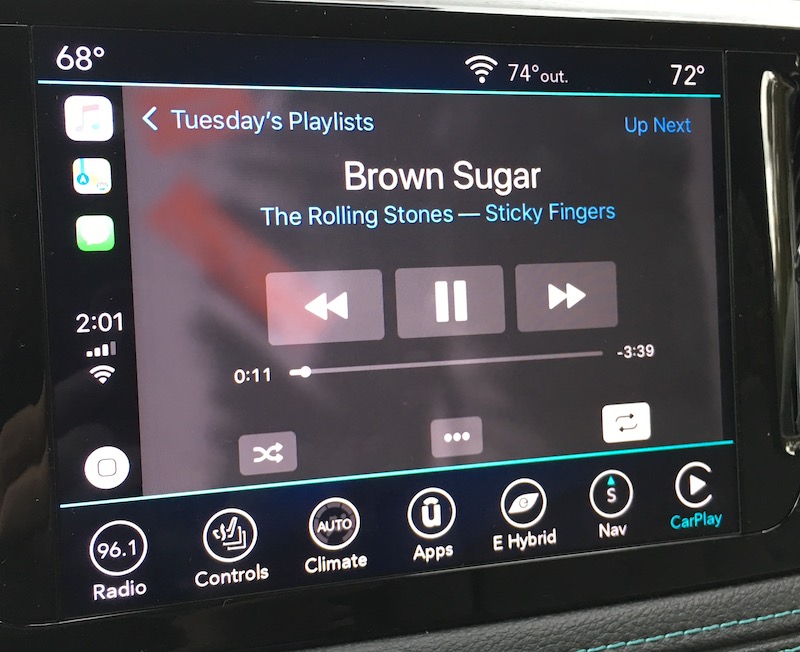
But with Uconnect, you never really leave the Uconnect system, even when CarPlay is running. You can always access the various Uconnect functions using the menu bar at the bottom, and just as easily get back to CarPlay. There isn't even a Chrysler icon on the CarPlay home screen, because you simply don't need it.

Google Maps in CarPlay

If you prefer to operate CarPlay on the Pacifica without using the touchscreen, you can use the hardware Browse/Enter knob below the display to scroll through the interface and select items, but it's much clunkier than direct touch manipulation and the knob is on the far side of the center stack from the driver.

CarPlay can also be controlled via Siri, and as with most other car manufacturers, Chrysler has opted for a dual-duty voice button on the steering wheel. A short press activates the built-in Uconnect voice assistant, while a long press brings up Siri.

Phone/voice/Siri buttons at lower left of steering wheel

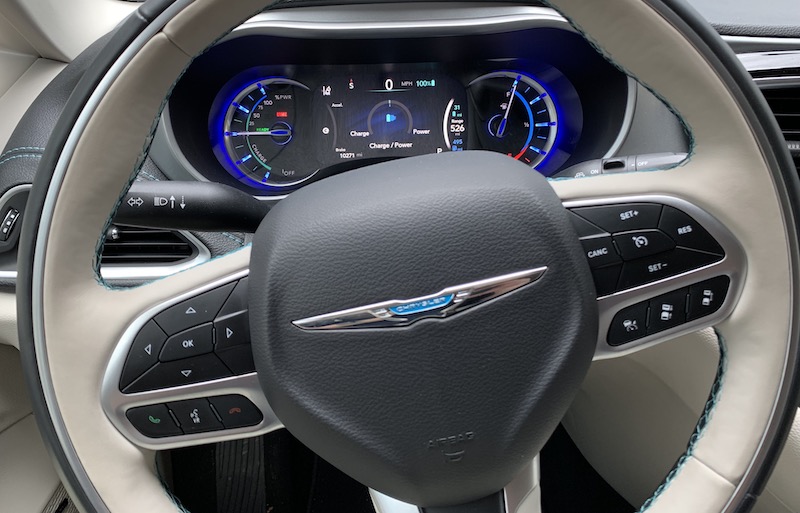
Overall, the Pacifica has quite a few steering wheel controls, which can be helpful once you learn the locations of all of them. Buttons on the front of the wheel are dedicated to cruise control, phone/voice assistant controls, and configuration controls for the driver display. Additional rocker-type switches are located on the back of the steering wheel, with the left switch used for changing radio stations and audio tracks and the right switch used for volume control and changing audio modes.

Uconnect Theater


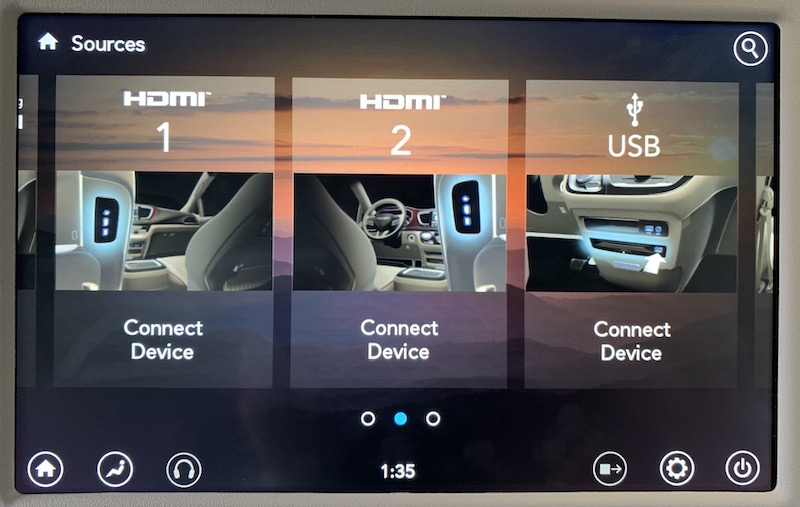
My test Pacifica came with Uconnect Theater, which includes dual 10.1-inch HD touchscreens on the front seatbacks, as well as a connected Blu-ray player up front and HDMI input, headphones, and remotes for each of the rear screens.


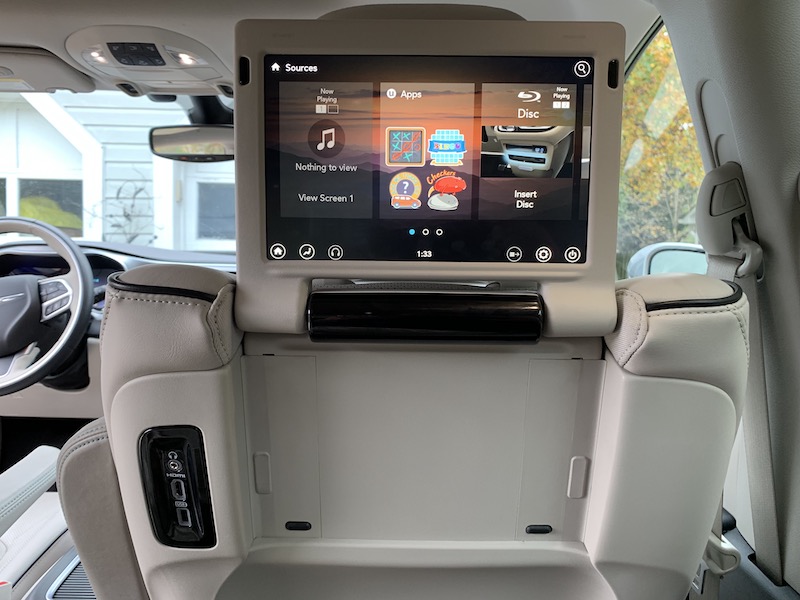
With various options for accessing videos, music, and even built-in games on Uconnect Theater, the kids can stay entertained on those long road trips. Miracast wireless streaming is also available from compatible devices, although that doesn't include iOS devices.


The two screens can operate independently or together, and inputs for one screen can be displayed on the other screen. Several of the included games like checkers and tic-tac-toe also support two-player gaming.


Ports


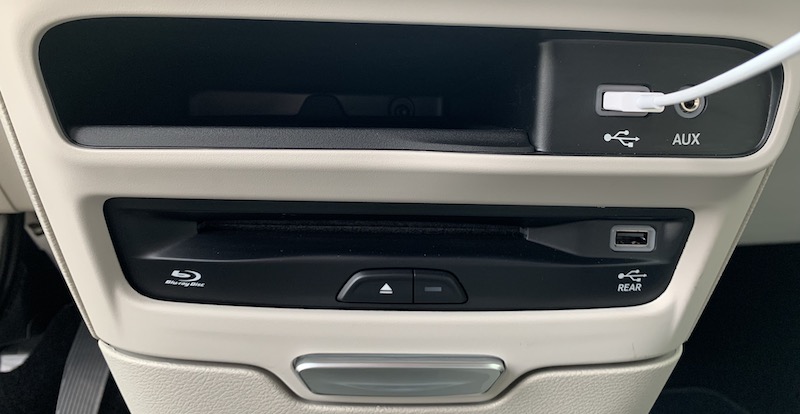
The Pacifica Hybrid is loaded with charging ports, as you might expect with a premium trim minivan. The center stack contains two USB ports, one next to an Aux port for connecting to the main Uconnect audio system and CarPlay, and a second one just below next to the Blu-ray player that can deliver content to the Uconnect Theater system.

Center stack Blu-ray player and USB ports for main and rear

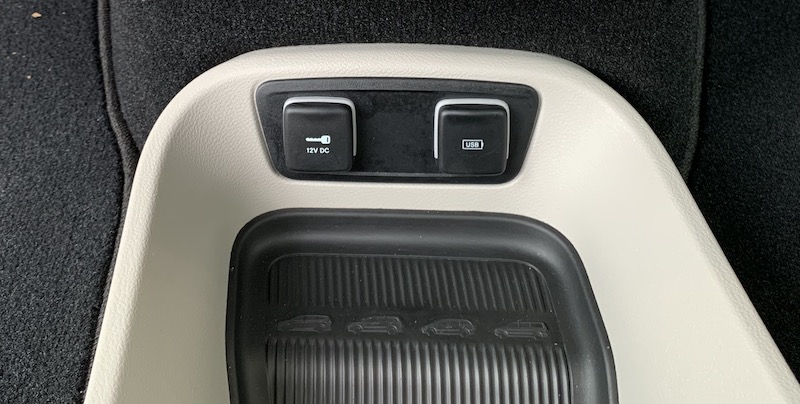
A third front USB port is located near the floor up front next to a 12V port.

USB and 12V ports adjacent to floor storage between center stack and console

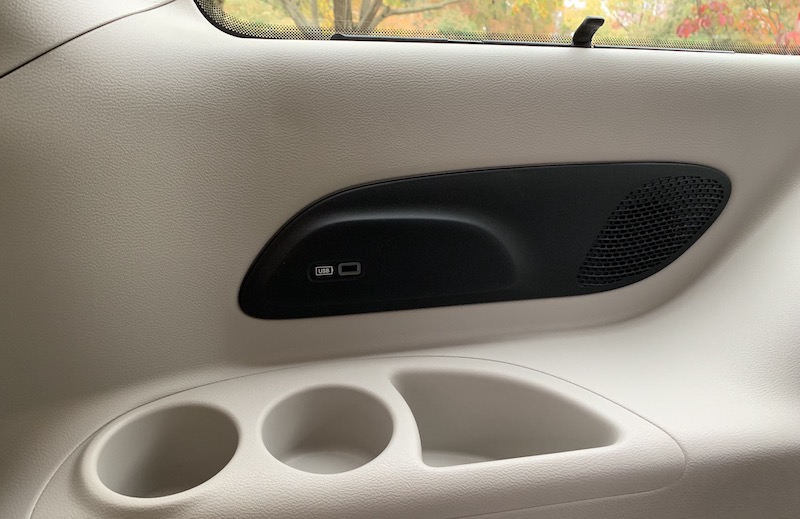
There's an additional USB port (and an HDMI port) located on each front seatback as part of the Uconnect Theater system, offering convenient charging for second-row passengers. And for those relegated to the third row, this model was equipped with one more USB port along the right side. For other power needs, there's another 12V port in the far rear of the minivan for tailgating and other situations, as well as a traditional 115V outlet tucked away on the right wall behind the second-row seats and the sliding door.

Third-row USB port

Wrap-up


I came away from the Pacifica Hybrid with a quite positive impression of the Uconnect infotainment system. It ticks most of the boxes when it comes to functionality and ease of use. The built-in navigation system worked well, and Uconnect offers a host of controls. The sheer number of control options in Uconnect can feel a bit overwhelming at times, but the ability to customize the bottom menu bar with your most frequently needed functions helps to streamline things.

Integration with CarPlay is excellent, and while I've typically appreciated widescreen displays that can share native infotainment content alongside CarPlay, FCA has shown me an excellent alternative in Uconnect with the persistent menu and status bars. The setup really does make it feel like Uconnect and CarPlay are working together rather than two completely different modes.

CarPlay is available on all Chrysler Pacifica trims, both regular and hybrid. Lower-tier non-hybrid models (L, LX, Touring Plus, and Touring L) all come with a 7-inch touchscreen Uconnect 4 system, while the larger 8.4-inch display comes standard on the Touring L Plus and Limited trims and is available as a package option on the Touring L. All three hybrid trims (Touring Plus, Touring L, and Limited) have at least the larger 8.4-inch system standard, with the navigation version standard on Limited.

Uconnect Theater, which is great for long road trips for the kids, is standard on the Touring L Plus and Hybrid Limited trims, and it's an option on the regular Limited trim.

The 2018 Pacifica Hybrid starts at $39,995 for the base Touring Plus trim, and CarPlay support comes standard. Higher-end Touring L and Limited trims are also available with upgraded options, and the Pacifica Hybrid currently qualifies for a $7,500 federal tax credit to help bring down the cost of eco-friendly vehicles. Non-hybrid Pacifica models start at $26,995. New 2019 models at similar prices and trim levels are also now starting to hit dealerships.

Related Roundup: CarPlay

Discuss this article in our forums


from MacRumors: Mac News and Rumors - All Stories https://ift.tt/2JVUICa

Amazon’s virtual assistant Alexa is now available on Windows 10


via News – MySmartPrice https://ift.tt/2zLFyLf

Grab A Pixelbook For $699 On Black Friday And Score 3-Months Of YouTube TV


via Chrome Unboxed – The Latest Chrome OS News https://ift.tt/2JYII2K

Twelve South Expands Journal Line With CaddySack, New Options for MacBook Pro and MacBook Air

https://ift.tt/2RSW0Rn

Twelve South today announced new additions to its Journal line of products, including Journal options for MacBook Air and MacBook Pro and a new Journal CaddySack for storing accessories.

The MacBook Journal, priced at $149.99, is designed to work with 13 and 15-inch MacBook Pro models and the new 13-inch Retina MacBook Air.


We had a chance to check out the Journal for MacBook ahead of its launch. It features rich, soft leather in a cognac color that will take on a unique patina as it ages, and the exterior, as the name suggests, looks like a journal complete with spine.

The leather exterior is accompanied by a soft black microsuede interior that keeps your MacBook from getting scratched and offers some light padding. When expanded, the bottom of the MacBook sits on top of the bottom of the Journal, while the top is held in place by two pieces of elastic.


Inside, at the bottom of the Journal case, there's a hidden interior pocket where you can keep documents safe. The entire Journal features a zipper closure with dual zippers so it won't come out during transport.


Twelve South is also introducing the Journal CaddySack, an alternative to the BookBook CaddySack it already offers. Priced at $90, the Journal CaddySack is designed to match the Journal for MacBook and the Journal for iPhone.

It too is made from a supple cognac leather that will develop a one-of-a-kind look over time, with an attractive gray tweed interior.


Several elastic and velcro straps inside of the CaddySack can hold a MacBook power adapter, charging cables, dongles, an Apple Pencil, and other accessories. There's also a zippered pocket at the top for other small odds and ends.


All of the straps inside of the CaddySack are adjustable, which gives you flexibility when deciding what you need to carry inside for day to day use. Like other Journal products, the CaddySack zips closed to protect everything located inside.

Twelve South's new Journal products can be purchased starting today from the Twelve South website.


Discuss this article in our forums


from MacRumors: Mac News and Rumors - All Stories https://ift.tt/2OC8k6h

Review: Vocolinc Offers the First HomeKit Supported Essential Oil Diffuser With the 'FlowerBud'

https://ift.tt/2RT1dZv

Apple's HomeKit platform has expanded to support a variety of device categories since its launch in 2014, now including lights, thermostats, ceiling fans, sprinklers, outlets, and humidifiers.


Although close in style to humidifiers, one specific accessory missing from HomeKit has been an essential oil diffuser, and now connected smart home brand Vocolinc has introduced the FlowerBud Smart Diffuser to rectify the situation.

Setup


Out of the box, the FlowerBud Smart Diffuser looks somewhat similar to other essential oil diffusers, and it's broken into two parts for quick-and-easy assembly. There's a 6.5-inch wide base that holds the water reservoir, and on its front there is a button for the mood light and one for the diffuser itself.


The water reservoir holds 300 ml of water, but you'll have to make two passes with the included measuring cup to fill the base to capacity, since it only holds about 150 ml. Underneath, you'll find a port to connect the AC adapter's barrel plug into, and the slightly elevated rubber feet make everything level even with the cord passing through.

Secondly, a separate top component (which is designed to look like a blooming flower) simply sits on the base, no screwing or snapping in place is required. When assembled, the FlowerBud measures 10 inches tall.


Once the base of the FlowerBud is plugged in and the device is set to off, you fill up the water reservoir to safe capacity, and sprinkle in a modest amount of any water-soluble 100% essential oil. It should be noted that Vocolinc does not include scented oils with the FlowerBud, nor does it sell any, but quality essential oil can be found at most major grocery and department stores nowadays, including Bed Bath and Beyond, Target, and Whole Foods.

With the water and essential oil added to the mix, setup continues by placing the top part of FlowerBud onto the base and downloading the Vocolinc LinkWise app from the iOS App Store. In this part of the setup, I ran into multiple issues pertaining to my Wi-Fi network and Vocolinc's requirement for the FlowerBud to be on a 2.4 GHz Wi-Fi network.


In the LinkWise app, the home screen has an "Add Device" button, which brings up the usual HomeKit screen that lets you scan a QR code or hold your iPhone near the FlowerBud to add it. I immediately received an error message that read "This accessory isn't compatible with your Wi-Fi router," meaning that my Wi-Fi was working under a 5 GHz network and the FlowerBud requires a 2.4 GHz connection.

Thankfully, my mesh network router has an iOS app that lets me easily switch which Wi-Fi band the router and each mesh point are on, as well as go through each of my devices to see which band they are running on. To troubleshoot, I switched my entire network to 2.4 GHz, factory reset the FlowerBud (holding the "Light" and "Mist" buttons simultaneously for five seconds), and tried adding it again, but it still failed. Unsure of what to do, I opened the Wi-Fi area of the iOS Settings app, and noticed at the bottom there was a prompt to set up the Vocolinc FlowerBud on my personal Wi-Fi network.

After clicking through a few screens that confirmed the process, the Settings app prompted me to visit the accessory's own app to continue setup. Before that, I switched over to my router's app and turned my main network back to a dual-band 5 GHz and 2.4 GHz setting, to test and see if the FlowerBud would be able to automatically connect to the network that it's compatible with.

I used the HomeKit QR code to again search for the FlowerBud, and this time it was added to my Home app as two accessories: a humidifier (for humidity detection and diffusing control) and a mood light. While this process was slightly arduous, particularly for an essential oil diffuser, all interactions since have been painless.

Home App


After everything was set up in HomeKit, I switched over to Apple's app to ensure Home and Siri controls would work like any other HomeKit device. For the past week the FlowerBud has done just that, and all voice-based commands sent to the diffuser and mood light have been as seamless as my Hue lights and Nanoleaf.

Particularly with Siri on HomePod, I haven't had any trouble with Siri understanding my commands for the diffuser, although you'll have to remember Siri/HomeKit thinks of it as a humidifier not a diffuser, so your terminology will have to be adjusted accordingly.


If you force touch on the FlowerBud in Home, you'll bring up a humidity control bar, which you can increase to anywhere between 0 percent and 100 percent. In terms of essential oil diffusion, this is the control area that will either decrease or increase the the misting effect as the accessory attempts to increase the indoor humidity.

As an example, at one point my office's humidity was at 55 percent, so I notched up the FlowerBud's humidifying level to 56 percent and a visible mist emitted from the top of the device. At 55 percent and below, the FlowerBud was on and diffusing oil, but the scent's travel was not as strong.


This could make finding a perfect activation level for the misting effect difficult, but since my office's indoor humidity stays relatively consistent, I simply set the FlowerBud to automate every morning at 8:00 a.m. to 65 percent humidity.

I added this as an automation to my existing morning setup in Home, and set the FlowerBud to turn off three hours later right before lunch, with the mood light following the same schedule. The FlowerBud can also be automated to turn on as you arrive home to fill your home or apartment with a pleasant scent, and turned off as you leave.


For the separate mood light, Apple's Home app treats the FlowerBud similar to any HomeKit light, so you can force touch to adjust its brightness or pick a new color. The options you select will be saved when the light is turned off, so the next time it's on it'll be the same brightness and color option that you prefer.


Vocolinc compares FlowerBud to Hue in this area, stating that there are 16 million colors to choose from, and in my testing the accessory did display a nice array of colorful options, from bright pinks and purples to deep reds, dark blues, and softer shades of yellow, orange, and white.

Vocolinc LinkWise App


You can also choose to perform all of these controls in Vocolinc's LinkWise app, but I wouldn't reccomend doing that. While the app's user interface is straightforward and slightly better than some third-party HomeKit accessories I've owned, it was one of the buggiest HomeKit-connected apps that I've used yet.


To get to the FlowerBud settings in the app you have to long press on the device's icon, but this entire section was inaccessible to me for about a week after I received the diffuser, since the app would crash every time I tried to open it. The company confirmed to me that they were working on a fix, and have since updated the app with a slightly new UI and addressed the crashing bug.

In the FlowerBud control section, I was able to control the mist levels of the FlowerBud (on a scale of 1-5), customize the light, create a weekly schedule, and set a timer for the diffuser to turn off (30 minutest to 8 hours). While these are in-depth controls, Apple's Home app provided me with enough alternatives so that I never felt like the connected diffuser was lacking in any way, even when the LinkWise app was broken.

In some areas Vocolinc's app is better (particularly with the granular misting scale), but in most others it's simply easier and more intuitive to control the FlowerBud using a combination of Home and Siri.

Daily Use


As far as actual essential oil diffusion goes, the FlowerBud has been comparable to other diffusers I've owned over the years, and better in some categories. Vocolinc recommends you place the FlowerBud in a room that measures 400 square feet or less, and I found the device's ultrasonic diffusion to be reliable and plenty widespread in my ~140 square foot office, with enough power to waft scent into a nearby hallway and bedroom.

The device itself was silent, but when you're close enough to it you will hear droplets of water occasionally; I found that the faint noise added to the relaxing effects of the diffusion process.


The 300 ml/10 ounce water reservoir sits right in the middle of the diffuser spectrum, with most low-cost diffusers sporting a 100 ml tank and higher-range ones rising to as much as 500 ml. 300 ml was a perfect balance for FlowerBud, with a water tank big enough to make the "set it and forget it" automation features feel useful, but small enough so that you can deplete it and switch to a new essential oil scent every few days.

From the first time I filled the tank it took five full days for the water to deplete fully, and each of those days the FlowerBud ran for 3-4 hours at a time. More often I needed to sprinkle in a few drops of essential oil to keep the scent strong and noticeable, which was just about every 2-3 days.


The FlowerBud's buttons also provide double duty with long presses. The Light button has a quick press to turn the mood light on/off, and a long press to change color, while the Mist button's quick press turns on the device and lets you cycle through 1-2 mist speed levels, and a long press sets the mist timer of two hours, four hours, or six hours.

All of this is accompanied by a loud beeping noise to confirm your inputs, which may be a downside for using the FlowerBud at your bedside when someone else is sleeping. Still, in the entire time I used the FlowerBud I relied on these physical buttons solely for the purposes of confirming they work as intended, and then went on using Siri and Home for all FlowerBud controls.


I liked the design of the unit and its all-white enclosure, which meshed perfectly with my office. I thought the FlowerBud was less visually busy than rival diffusers, with just two buttons on the front and the only visible text being the Vocolinc logo, which itself is subtle enough thanks to a light gray shading.

Still, the unit's all-plastic encasing makes it feel a bit cheap compared to high-end ceramic diffusers, and even with a full tank it can feel light on its feet. If you order one, double check to make sure the rubberized feet are secured underneath the device as well; mine were loose in the box and it took me a few days to figure out why the diffuser was slightly lopsided.

Bottom Line


Overall, Vocolinc obviously made some concessions to get the cost of the FlowerBud down to around the average mid-range price of an oil diffuser, cutting corners with some of its smart automation features and its physical design, but in the end I'd say the company hit a great balance between the two.


There are issues with the device, particularly related to its initial setup and buggy LinkWise app, but the post-setup experience was a breeze and Vocolinc's app can essentially be ignored in favor of controls provided by Apple's HomeKit, Amazon's Alexa, or the Google Assistant, making the Vocolinc FlowerBud Smart Diffuser a fun and unique addition to most smart homes.

How to Buy


You can purchase the Vocolinc FlowerBud Smart Diffuser on Amazon for $49.99.

Note: MacRumors is an affiliate partner with Amazon. When you click a link and make a purchase, we may receive a small payment, which helps us keep the site running.


Discuss this article in our forums


from MacRumors: Mac News and Rumors - All Stories https://ift.tt/2qFTwtX

Lyft Announces 'Lyft Rewards' Loyalty Program Coming in December for Select Riders

https://ift.tt/2z60rkN

Lyft today revealed that a loyalty program for its customers, "Lyft Rewards," will begin rolling out for select passengers in December, allowing these users to be rewarded for using the service.

The program will work by tracking each time you use Lyft to get around, netting you points for every dollar that you spend on the ride-hailing service. With enough points, you'll earn rewards like an upgrade to Lyft Lux or discounts on a future ride. In the app, Lyft will show you how close you are to your next reward.


The company says that it will continue to work on Lyft Rewards over time, and is brainstorming future additions to the service, including reward perks like ride upgrades, access to more experienced rivers, and double points days.

Following the December 2018 rollout for select riders in various cities, Lyft Rewards will be available to more riders in the new year. The company says it will begin sending out email notifications to those eligible for the December phase of the program sometime soon.

Tag: Lyft

Discuss this article in our forums


from MacRumors: Mac News and Rumors - All Stories https://ift.tt/2FjmJ8c

Volkswagen Car-Net iOS App Now Supports Siri and Siri Shortcuts for Vehicle Unlocking and More

https://ift.tt/2B1s9k0

Volkswagen today announced that subscribers of its Car-Net service can now use the iOS app and Siri to lock and unlock their car. The Siri command for this will be, "Hey Siri, lock my car."

With the feature, Volkswagen owners can also start and stop a charging session for electric cars, set a specific temperature in the car, locate the car, turn on the defroster, check estimated mileage, check charge levels, and enable the honk and flash alarm commands.


The company also confirmed that Car-Net supports Apple's new Siri Shortcuts app, allowing drivers to set personalized phrases that activate these Volkswagen connected car abilities alongside other smart home commands.
“We are constantly looking at innovative ways to make VW Car-Net more convenient and relevant for our customers,” said Abdallah Shanti, EVP, Global Chief Information Officer Volkswagen Brand & Car-IT. “With Siri Shortcuts, creating voice commands to use with our mobile app was a great opportunity to do just that! Integration with Siri helps our drivers keep eyes on the road and hands on the wheel.”
Siri Shortcuts debuted in iOS 12 this past September, allowing users to create complex commands that tie together numerous apps, services, and smart home devices into one speakable phrase. To get the update for the VW Car-Net app, you'll need iOS 12 or later on iPhone [Direct Link].

Related Roundup: CarPlay

Discuss this article in our forums


from MacRumors: Mac News and Rumors - All Stories https://ift.tt/2QHAqPG